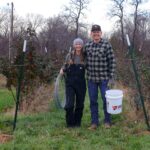
How to Build a Blackberry Trellis
A very sturdy blackberry trellis that will stand the test of time.
Equipment
- 1 power drill with long 1/2" drill bit
- 1 Post hole digger
- 1 Tamping rod/stick I just use a wood stick with a flat end, works fine
- 1 pair of heavy duty wire cutters I use an angle grinder for the bigger, high tensile wire
- 1 3/8" drill bit
- 1 1/2" drill bit (long) needs to be able to drill thru the wood fence post
- 1 pair of fencing pliers
- 1 level
- 1 60 degree measuring tool I made one. Watch linked video for how I made mine
- 1 hammer
- 1 T-post pounder
- 1 string line
- 1 spinning jenny optional, but nice to have if you are doing multiple rows
Materials
- 2 8ft Treated fence posts
- 10 7ft T-posts
- 20 pieces T-post fence clips
- Crushed gravel for post holes
- 2 Fencing nails
- 2 3/8” open eye hooks
- 4 In-Line Wire strainers
- 2 16” screwing ground anchors
- 500 ft 12.5 gauge wire
- 20 ft 14 gauge wire
Instructions
- STEP 1: Mark out areas where post holes will be dug at the end(s) of your rows. Keep in mind, the posts will stick out about 4 feet from the actual hole so allow room for mowers, tractors, weed trimmers, wheel barrows, irrigation, etc.

- STEP 2: Dig a hole at each end where you marked; 3 feet deep, at a 60 degree angle. If you have irrigation or any underground lines, ensure you don’t hit them when digging.
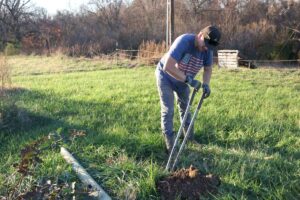
- STEP 3: Place a 8 ft wood post in each hole. While holding the posts steady at a 60 degree angle, fill the hole around the post halfway with crushed gravel, and compact it with the tamping rod/stick. (Tip: may be useful to hire a friend to help with this part). After compacted, fill the rest of the hole with gravel and compact again. If done right, by this point the post shouldn’t move when you let go of it, and it should feel pretty tight in the hole, even at a 60 degree lean.

- STEP 4: Screw in ground anchor and fencing nail in preparation for running the guy wire. Measure 4ft out from the post hole, and screw the ground anchor into the ground, until it’s flush with the ground. Next, using a hammer, pound the fencing nail in the top side of the wood post at roughly 4ft off the ground, leaving enough space exposed to still feed the 12.5 gauge wire through the nail hole.
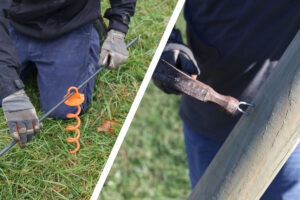
- STEP 5: Attach guy wire between wood post and the ground. Cut six feet of wire and feed the one end through this nail hole and the other end thru the ground screw. Pull the wires taut, and twist them around each other to create a secure loop that will hold under pressure. Using wire snippers, cut any excess wires off.
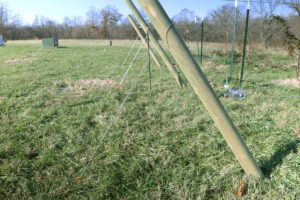
- STEP 6: End T-posts Pound two T-posts at the beginning of the blackberry row, a few feet in from where your post hole is. The T-posts should also be pounded into the ground at an angle, At the base, the T-posts should be 18 inches apart, and when pounded in a foot or so, there should be roughly a 4 ft gap between the TOPS of the T-posts.
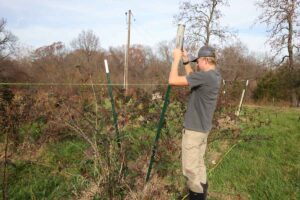
- STEP 7: Other end T-Posts. Pound two more T posts on each side of the row at the END of the blackberry row this time, a few feet in from the post hole. The angles should match the first pair of T-posts already in the ground, or be really close.

- STEP 8: Run a string line around the tops of these four T-posts, creating a “box” 5 ft up from the ground. This string line will be your reference for the rest of the T-posts and what angles they should be pounded in without having to precisely measure them each time.
- STEP 9: Pound the remaining six T-posts along the row, in pairs at 25 ft increments. So in the end there will be 5 pairs of “V” posts down the blackberry rows, one pair at 0’, one pair at 25’, one at 50’, one at 75’, and the last pair at the end of the row, 100’ down. Remove the string line.

- STEP 10: Anchor the 100ft wires on the far post by first drilling two ½” holes thru the END post, one at 24” from the ground, and another hole at 48” from the ground. Run four 100ft wires down the sides of the rows, two on each side, Take the two wires that will be the lower trellis wires, and feed them BOTH thru the hold you just drilled. Pull enough extra wire thru that you can wrap the wire around the wood post and then twist tie the wires together. This will anchor the wires so you can tighten them with tension from the other end or the row. Repeat this with the higher trellis wires. Using wire snippers, cut any excess wire off.

- STEP 11: Secure the trellis wires to the T-posts. At each T-post, measure up 24” and 48” and using T-post clips or short wires, secure the trellis wires to the T-posts. Leave them just loose enough that when tightened the wires are still able to slide back and forth as they are pulled taut.

- STEP 12: Stretch/Tighten the trellis wires. At the front end of the blackberry row, drill a ⅜” hole halfway thru the wood post at 24” up and 48” up from the ground. Screw a ⅜” open ended eye bolt into each one of the holes. Slide two in line wire strainers onto each eye bolt. Push the loose ends of the four trellis lines into the corresponding wire strainers, and tighten. Walk down the line as you tighten to ensure there aren’t any kinks, snags, or other hang ups.

Notes
- Bury the T-posts at least 2 feet deep in the ground so they can’t move. This is a mistake we made and had to remedy. High tensile wire will push the posts inward if they aren’t buried deep enough in the ground. You want to keep the V shape. This allows space for the primocanes to grow in the middle during the summer and the floricanes to rest on the outer edge.
- Find a helper - This trellis 'could' be build by yourself, but there are a lot of steps that go way smoother with additional help, and...you have someone to talk to :)
- Make sure that the In-Line wire tensioners are facing the "out" so that you can tighten them. If you do them the wrong way, the part the pliers grabs to will be on the inside, inaccessible.
- When tightening the long trellis wires, tighten them all to about 80%, then rotate tightening them each a little at a time. This will allow lines to tighten evenly and will avoid sudden shifts and movement due to overtightening.
- If your flexible, schedule to do this project a day or two after a heavy rain. Holes will be easier to dig, t-posts will pound in the ground easier and your back will thank you.
