Pressure Canning | A Beginners Guide
This simple but in-depth guide will help you learn how to pressure can with confidence. I’ve canned thousands of jars of food and can help you get started. Pressure canning can help you safely preserve lots of food when it’s done correctly.

What is pressure canning?
A pressure canner work by becoming pressurized with steam, thus raising the temperature above the boiling point up to 240ºF. Contents of the jars are being heated by conduction.
It is necessary to raise the temperature above the boiling point when canning low acid foods above pH 4.6.
“In order to destroy all bacteria and the spores and toxins they produce, low acid foods must be heated to a temperature of 240ºF and held there for the time specified by the recipe.” Ball Blue Book Guide to Preserving
Pressure Canning vs. Water bath Canning
When you get started with canning it’s important to note that there are two types of canning, boiling water bath and steam pressure canning.
Steam Pressure canning is used to preserve low acid foods in liquid. Low acid foods when heated and sealed in an anaerobic environment, are subject to bacterial spores which emit toxins UNLESS they are heated to 240ºF. This temperature is achieved with a pressure canner and the proper processing time.
Boiling water bath is used with high acid foods or foods that have a high acid liquid added. The water is heated to a boiling temperature 212ºF. Thus the contents of canned food is heated to 212ºF when enough time elapses.
Here is my step by step guide on how to water bath can.
Which Method of Canning Should You Use?
To put this simply, as long as you follow a recipe that has been tested for safety in a laboratory, it will direct you with the proper method.
Foods with a Ph of 4.6 and below (high acid) are safely water bath canned.
Examples of High Acid Foods for Water Bath Canning:
- Apples
- Cranberries
- Blueberries
- Lemons
- Plums
- Blackberries
- Sour cherries
- Yellow peaches
- Pears
- Grapes
- Pickles
- Fruit Jams and Jellies

Included in the high acid group are vegetables that have vinegar, lemon or lime juice, or citric acid added to make them become high acid. For example, pickles of all kinds, chutney, relishes, and salsa.
Examples of Low Acid Foods for Pressure Canning ONLY:
- Soups
- Meats
- Green beans (when canned plain with only salt and water)
- Potatoes
- Dried Beans
- Corn
Once you cross over into ph 4.6 or above, the food MUST be pressure canned. In low acid foods, a bacteria known as bacterium clostridium botulinum can cause a potentially serious food poisoning known as botulism.
Sometimes a combination of low acid and high acid foods will be above pH 4.6 and should be pressure canned. An example of this is spaghetti sauce. This is made with mostly tomatoes which are usually borderline high acid. But once you add onions and garlic it is often above pH 4.6 and needs to be pressure canned.
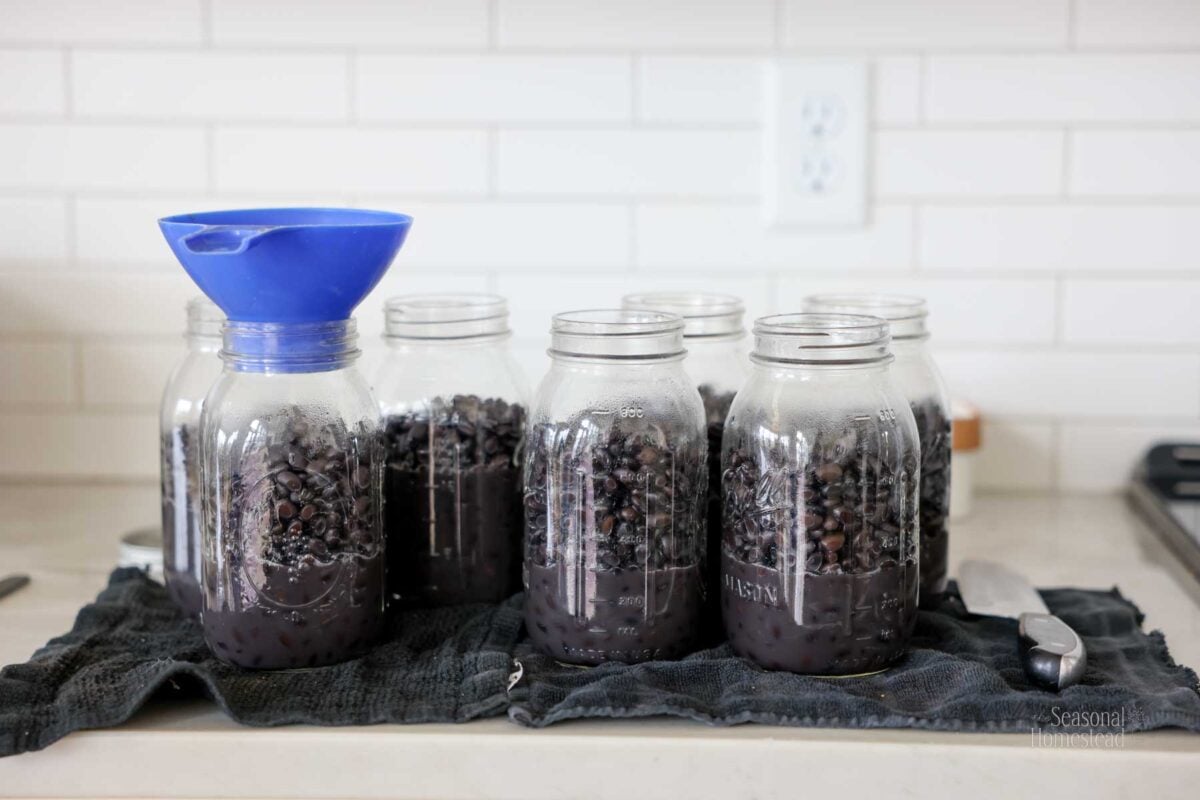
As an example, I recently pressure canned black beans. These need to be pressure canned for 90 minutes. Pounds of pressure used is based on altitude. 0-1000 feet above sea level uses 10lbs of pressure and 1001+ feet above sea level uses 15lbs of pressure.
The Ball Guide to Preserving states:
Botulism-causing bacteria thrives on low acids in the absence of air in moist environments- exactly the conditions inside a jar of canned vegetables, meats and other low-acid foods.
Even though it sounds scary, don’t let it hold you back. If a tested canning recipe is followed exactly, there is no need to have fear of poisoning yourself or family.
Equipment

The basic canning equipment for pressure canning is:
- Pressure Canner
- Rack for inside pressure canner (this is usually included when you buy one)
- Mason Jars
- Headspace Measuring Tool
- Canning Rings
- Ladle
- Chopsticks or Wooden Skewers
- Jar Lifters
- Funnel
- Jar Lids
I recommend getting equipment made especially for canning. If you plan on canning more than a couple times, it’s worth the cost. For more details, check out my blog post about canning equipment, it details why each item is necessary, and links to what I use and recommend.
Video Tutorial How to Pressure Can
This is a tutorial I did on pressure canning. I can chicken stock which is a very simple recipe and great for beginners.

Step by Step Instructions For Pressure Canning
Note: Every pressure canner is going to have slightly different instructions. The canner I have is an All American Pressure Canner. I highly recommend it.
1. PREPARE JARS
First, check for any chips on the rims of the jars or hairline cracks in the jars. Remove any that have problems. Next, heat the jars.

The jars do not need to be sterile but they must be hot. This can be done by filling the canning pot fitted with a rack with warm water and jars, then heating them up over a stove top. Other options include running a short hot water cycle in the dishwasher with only canning jars and no soap. Keep the dishwasher closed until the jars are ready to use. Dry heating in an oven is not recommended.
2. PREPARE LIDS AND RINGS.
Most canning lids have instructions on the back of the box specific to that brand. For Ball and Kerr brand lids or similar, they need to be washed in warm to hot water. I usually do about 100ºF or when the water feels hot to the touch. I rinse them under the faucet at the sink. Also, rinse rings in hot water as well. Set aside.

NOTE: Canning lids DO NOT need to be heated to 180ºF. This is an old method that has proved to be unnecessary. The hot water rinse is sufficient. **And adding my personal experience here, 15 years ago when I first started, I heated the lids as recommended. It added time and I had way more seal failures than I do now. I’m so glad that we now have an easier method that works better!
3. MAKE RECIPE
As the jars are heating, make the canning recipe. How the food is prepared varies widely based on what recipe you are following. Following the recipe exactly is important for a safe end result.
4. PACKING
When the food is ready to be packed in jars, take the hot and empty mason jars and set them on a firm surface with a cloth or clean rag underneath. Fill the jars with the food. Sometimes the recipe is already all together like a soup, sometimes food is placed in the jar and hot brine is added, like when pressure canning green beans.
Either way the most important thing when filling the jar is to place hot food and/or hot liquid in a hot jar. Nothing should be boiling and nothing should be cold (with the exception of food that is raw packed, but even then the liquid should be hot.)
There are a couple reasons for this, one reason is if the jars are cold or the food is cold there is a chance the jars can crack from the temperature difference. The other reason is all canning recipe processing times are calculated based on having hot liquid and/or food. If it is cold then the processing time would need to be longer to ensure the microorganisms have been destroyed.
5. REMOVE AIR BUBBLES
Take a clean wooden skewer or slim wooden utensil and slide it down the side of the jar in a few places. This removes any air bubbles that are trapped in the jar which can happen sometimes when filling.
6. MEASURE HEADSPACE
Headspace is the space in the jar between the top of the food or liquid and the top of the jar. A tool for measuring this space comes with most canning kits or you can even use a regular ruler. Almost every recipe states how much headspace is needed to create a proper vacuum seal.
The Ball Blue Book guide to preserving states:
As a general rule, leave 1-inch headspace for low-acid foods, vegetables and meats; ½-inch headspace for high acid foods, fruits and tomatoes; ¼-inch headspace for juices, jams, jellies, pickles and relishes. Care must be taken in filling the jars to the correct headspace.
7. WIPE RIMS, ADD LIDS AND RINGS
Next, wipe the rims of the jars with a clean, damp cloth. When pressure canning, always use vinegar to wipe the jar rims. The reason for wiping the rims is to remove any food residue and the vinegar cuts through any grease or oil on the rim. This will help the lids to seal well.
Add a lid to each jar, then secure with a metal ring. Lids will need to be as centered as possible so the sealing compound is touching the glass on the rim. Then screw the ring overtop to keep it in place.

Rings should be “finger-tip tight” meaning that you tighten the rings with ONLY your finger tips. This keeps the ring from going on too tight. However, it should be firm and snug, even when done with finger tips.
8. PROCESSING
PREPARE CANNER & LOAD JARS
Fill a pressure canner with 2-3 inches of hot water. The best water temperature is the one that nearly matches your jars and the food packed in them.
Load the jars into the prepared pressure canner, fitted with a rack. The rim should be facing down. NEVER place jars directly on the bottom of the canner.

Place prepared jars in a pressure canner. Stagger the top layer if there are two layers using a rack between layers.
The jars don’t have to be covered completely with water.
LOCK LID
Place cover on the pressure canner. For the All American Canner, be sure that you have oiled the metal surfaces where the cover and pressure canning pot meet. I use olive oil for this job. Line up the arrows so the top arrow is a little to the right. Then turn the lid clockwise to lock into place.
Next, grasp two opposite wing nuts and turn them clockwise at the same time until evenly tight. Finally, grab another set of wing nuts opposite each other and tighten. Repeat until all are tightened.
TURN ON HEAT & VENT STEAM
Turn on heat to high and heat until a steady column of steam escapes from the vent pipe for ten minutes before placing the pressure regulator weight on the vent pipe.

BRING TO PRESSURE
If your recipe calls for cooking at 15 pounds (usually if you are pressure canning 1000 ft above sea level or more this it would be 15 pounds of pressure), set the pressure regulator weight over the vent pipe at the hole marked with the number 15. Likewise if canning with 10 pounds of pressure (0-1000 ft above sea level) place the number 10 over the vent pipe.

PROCESS JARS AT CORRECT PRESSURE FOR AMOUNT OF TIME STATED ON RECIPE
Start counting your processing time from the first jiggle or rock of the pressure regulator weight. BUT…
You’ll want to make sure the heat is consistent before starting the timer. If the pressure dips too low you’ll need to start the processing time all over again. So I start counting the processing time as soon as I have my pressure consistently at 15 pounds of pressure.

The weight should jiggle or rock one to four times per minute. Never turn up the heat to the point of constant flow of steam escaping, thereby causing the pressure regulator weight to be in the “up” position. If this happens gently nudge the pressure regulator weight back into position.
When all jars of food have been processed for the proper amount of time and the correct pressure the ENTIRE time, turn off the heat source.
NATURALLY ALLOW TO COOL & JAR REMOVAL
Allow the canner to cool naturally. DO NOT remove the weighted gauge or open the petcock until the canner has depressurized and returned to zero pressure. Remove gauge or open petcock. Unlock the lid and lift it off the canner base, being careful that the steam escapes away from you. Let the canner cool for 10 minutes before removing jars.

Remove jars from the canner pulling up straight and setting them upright on a firm surface with a towel or clean cloth underneath. Do not tip the jars as you pull them out to get the water off the lid. Another thing to avoid is touching part of the canning jars. For example, don’t try and push in the seal. Iit will make a “pop” sound on its own if the jar has been sealed properly. Also, don’t tighten the ring. Basically don’t touch it!
CHECK SEALS
Let jars cool naturally on the counter for 12-24 hours. After that time check the seal by seeing if the middle of the lid is concave. Press the center and make sure the lid doesn’t flex at all. An additional way to test the seal is to try and lift the lid off with your fingertips. If it holds firm to the jar, and the center doesn’t flex. It’s sealed well.

The final step is to remove the ring and take a clean rag and wipe off any residue underneath. Keep the rings off for storage. The reason for not having a ring on is It makes it easier to spot a jar that loses a seal. And it also keeps away mold that might form on food or liquid trapped under a canning ring.
9. STORAGE
Store at room temperature, 50-70ºF ideally. Properly canned food can be stored for 1-2 years. After a year, the food quality begins to go down. I’ve personally had canned food for three or four years but I wouldn’t eat canned food past four years old. Likely, the nutrient density, consistency, and quality is so low it’s not worth eating.

Light destroys vitamins so store in a place that is absent of light, like a cabinet or room that doesn’t receive direct sunlight.
FAQ
Processing when heat is applied to food contained in canning jars at the correct temperature, and held at that temperature for a time specified on a tested recipe.
No, most vacuum seal lids aren’t reusable and are one time use. However, there is a certain type of lid that is reusable and that is Tattler brand lids. The method of using these lids is quite different from single use lids. Make sure you read instructions carefully for success.
If you are a beginner, I highly recommend using a recipe. Instructions for home recipes and what not to process in a pressure canner can be found at the National Home Center for Food Preservation.


