Our First Time Butchering Meat Chickens | What We Learned
Even though we have butchered four of our heritage roosters before, a few weeks ago was our first time butchering legit meat chickens. They were Cornish Cross breed, the fastest growing of all the meat breeds and the most common here in the US.
I hope to explain a little bit of our process, what worked well, and what we will change for next time. We are by no means experts after only having done this once but I do feel like we learned a lot.
This post contains some affiliate links. I link to supplies I actually used during butchering, whether I’m an affiliate of that company or not. We were really happy with the equipment we bought and I hope it helps you too! Full disclosure found here.
Our Process:
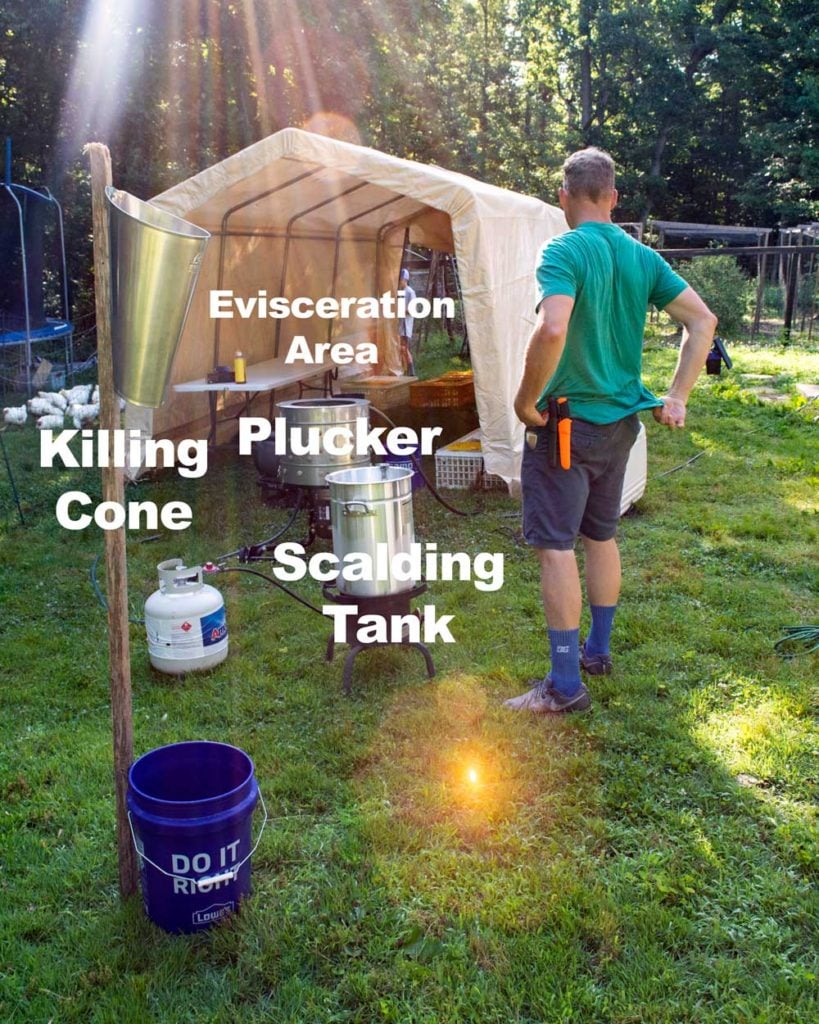
Killing Cone
We had Cameron doing the killing cone the entire time. This isn’t my strong suit and I was happy to pass this job off to Cam.
The killing cone helps keep the chicken from flapping all over and also relaxes them. We slit the jugular on the side of the neck and it lets the bird pass out from blood loss and eventually die. This is considered one of the most humane ways to do it.
The killing cone I bought can be found HERE.
Scalding Tank
Next was the scalding tank. In the past we had used an old canning pot but it was never deep enough to get an even dunk of the chicken underwater. This time we bought a turkey fryer with a thermometer and it worked great because it was deep enough to put in the whole bird.
We kept the water temperature right at 150ºF and it was perfect. I had heard it takes a lot of fiddling with the temperature because every time you put a bird in it cools off but it really wasn’t that bad. We adjusted it about 5 times during the 50 chickens. It was also extremely hot that day so that probably helped keep the water at the correct temperature.
We found the turkey fryer also known as the scalding tank HERE.
Plucking
We plucked feathers by hand when we dispatched a few of our heritage birds. It was enough work that I knew for sure I needed a plucking machine to do 50 birds in a day. We ended up with THIS ONE and it worked well but we did have the breaker go off on it once causing some drama (if you didn’t read the story of our butchering yet you can find it HERE).
It was so worth it. The kids happily took over this job since it is the easiest. 15 or 20 seconds and the entire bird is plucked and ready for evisceration.
Evisceration/ Gutting
This was my job the whole time since I don’t mind it. The kids were pretty worried about popping the gallbladder since most of the videos we watched really emphasized the danger of it. They didn’t want to be the one to ruin a bird with bitter gall juice.
However, after showing them how it was well protected by the organs around it when pulling out the guts, they were willing to do a few birds.
We followed Joel and Daniel Salatin’s method of evisceration. I used THIS VIDEO to teach myself and found it helpful.
We didn’t save the liver, Cam said he wouldn’t eat whatever I used it in. But I did save the hearts and probably won’t tell him when they are in a meal.
We also tossed the gizzard, feet, and all the other innards. I know the feet are good for you but we aren’t there yet. I got asked a lot what we did with the guts and the truth is we just tossed them in the woods and they were gone in a day. The wild animals around us loved them!
Ice Bath
After we finished each bird we threw it in a cooler filled with ice and water. We used THIS ONE and it fit about 20-25 birds. We bought another cooler half way through when we realized we would need more space.
The chickens sat in the ice water for at least 4 hours but some were in for 18 hours. We just made sure they had plenty of ice.

Packaging
We did a combination of whole birds and cut parts. For the whole birds, after chilling we rinsed the birds and then packaged them in shrink wrap bags.
How this works is you place the bird in the bag (it works best if the legs are tucked in), add a zip tie to the top but don’t pull it completely tight yet. We left enough space to insert a metal straw into the zip tie and down into the bag.
After the straw was inserted we pulled the zip tie taut around the straw. The straw allows the air to escape as you dunk the bird in hot water. Our shrink bags had a recommended temperature of 180ºF and you dunk for three seconds. The bag shrinks around the bird in the hot water. We pull it out the bird after the dunk and simultaneously pull the straw out and zip up the bag really quick.
After we finished all the bags they were cool enough to put in the freezer. We were loading them into an empty freezer which worked well because the birds still retain a little heat and you don’t want them to heat up any surrounding food in the freezer.
We bought our shrink wrap bags HERE, in the 10 x18 size. Don’t forget zip-ties sometimes they are sold separately! We bought some metal straws at our local Walmart.
We also cut chickens into pieces because I use chickens like that for lots of meals. Again, I watched a video by Daniel Salatin on how to do that. The speed at which he can cut a chicken into pieces is crazy impressive! It’s fun to watch even if you aren’t planning on cutting up a chicken anytime soon. Fast Version of parting a chicken can be found HERE and slow how-to version found HERE.
We cut legs and thighs, wings, breasts, and saved the backs/ rest of the carcass for bone broth. I used my vacuum sealer (found HERE) to keep them from getting freezer burn and it worked amazing!

What we will do differently:
#1 Buy more than one killing cone.
When we butchered our roosters last year we had no killing cone so I figure buying one was a big step up! It definitely helped a ton and I wouldn’t do a large batch of meat chickens without a killing cone from now on.
However, I failed to realize that when you slit the throat and the blood drains, it takes a minute or two for the chicken to finish bleeding out and be fully dead.
Waiting for those few minutes really slowed down the process because everyone at their station down the line didn’t have anything to do.
#2 Have more than one person at the evisceration table.
This was another hang up in the process. For most of the time it was just me at the evisceration table but this is another time consuming station. I am pretty new at evisceration still and it took me a few minutes each bird. Once I had a few of my kids trained and at the table with me we were moving fast!
#3 Have chickens ready for butchering in the Fall.
This is definitely something that is area specific but it would have been much better to have the chickens ready for butchering in the fall and I will explain why.
On the day we picked up the chickens from our farm friends it was 90ºF. We loaded the chickens in the crates to transport home at 7pm and by 8:30pm (they were nice and gave us a tour of their farm) when it was time to leave, there was one chicken already dead in the crates.
We did not pack them tight and they literally had just had water. It was so hot and the birds were not hardy at all so one died right there!
We had two more die on the ten minute drive home and I was so worried about it, we took them all out of the crates when we got home and gave them water.
The next day, all survived but I was very nervous to put them back in the crates for fear they would overheat.
The result of that was we had them out on grass which they ate pretty aggressively since we had withheld the food for the butchering. By the afternoon the chickens we butchered had grass not only in the crop but all through the intestines. It was fine but not ideal.
The other problem with the heat was our killing cone which is made of metal, got so hot it started to burn the birds skin prior to killing. I felt so bad about this! But being new at this we didn’t realize until we had butchered a few and noticed pink spots where the feathers were.
We finally put two and two together and sprayed down the cone with water. It alleviated the problem temporarily but we had to keep doing that since the cone was set up in a sunny location.
It would have been much better to do on a cool fall day.

#4 Try a Different Breed of Meat Bird
This one is a personal choice- but I did not like the cornish cross breed. Based on what I shared above about their disposition and how they could easily keel over from one wrong move, they were not a good fit for the way I homestead.
One of the main reasons I got into homesteading was for improving my health and to raise and eat a bird that isn’t very healthy itself doesn’t make sense to me. I am on the hunt for a more hearty and healthy bird that still has a good amount of meat on it after butchering.
We may try Freedom Rangers next year to see how they compare but they are also a hybrid bird. From what I hear and have read they are a four way cross. Even though I’ve heard of people breeding them, there is no guarantee they will keep the same characteristics in the offspring. I would really prefer to find a bird that is hardy and purebred.
If you have tried a heritage breed that has worked well for you please let me know!
#5 Buy Some More Ice Making Containers and Make My Own Ice
This may sound silly but I don’t like to buy ice. I would much rather make our own! When you are getting ready to butcher chickens you usually have an empty freezer ready for them so there is plenty of room to make ice a few days before. I will definitely be purchasing some additional containers next time so we can do that.
I think we went through 15 bags of ice from the store if I’m remembering right.

What worked well for us:
#1 Getting the right tools
I don’t think you can go wrong getting too much equipment but if you are on a budget a plucker is worth every penny! I was also happy with the turkey fryer set up for scalding.
We also invested in some new knives. I really like the one I bought (found HERE). It made the process much faster.
For aprons we bought THESE ones and they worked well and are a great price.
The coolers we used were great too. Make sure you have ample space for the amount of chickens you are doing. We used two 150 quart size for 50 chickens and they just barely fit.
#2 Using a Tent for Shade
On the 90ºF day we butchered it was so worth it to work in shade. We had a friend with a carport they were not using and they let us have it for the butchering. It worked great!
#3 Having an Organized Butchering Process
The assembly line set up worked really well. Our chickens were literally passed down the line from station to station.
#4 Allowing Enough Time
We planned on a full day of butchering and I’m glad we did! The actual butchering didn’t take as long as we planned but the packaging took longer than anticipated. It was a FULL day.

Conclusion
Overall, it was a good experience, even though it was tiring! We will definitely do it again next year and experiment with some different types of birds. I know lots of people like to invite friends to the butchering party and that can be a great way to make it more enjoyable. We may try that next time.
Chickens are an easy animal to use as the gateway to home butchering. This lost skill is definitely worth learning and doing!


