Starting Seeds Outdoors in Containers or Soil Blocks
Starting seeds outdoors in containers or soil blocks is a great alternative to indoor seed starting! There are a ton of benefits, it’s low cost, and best of all it’s very easy.

There are also many methods of how to start seedlings outdoors and we’ll go over those too!
First off, which is better for seed starting, containers or soil blocks?
Containers are anything that holds a soil medium. Some common examples are plastic trays, peat pots, recycled egg cartons, and even folded paper pots. They are easy to use and don’t take much time to fill and start.
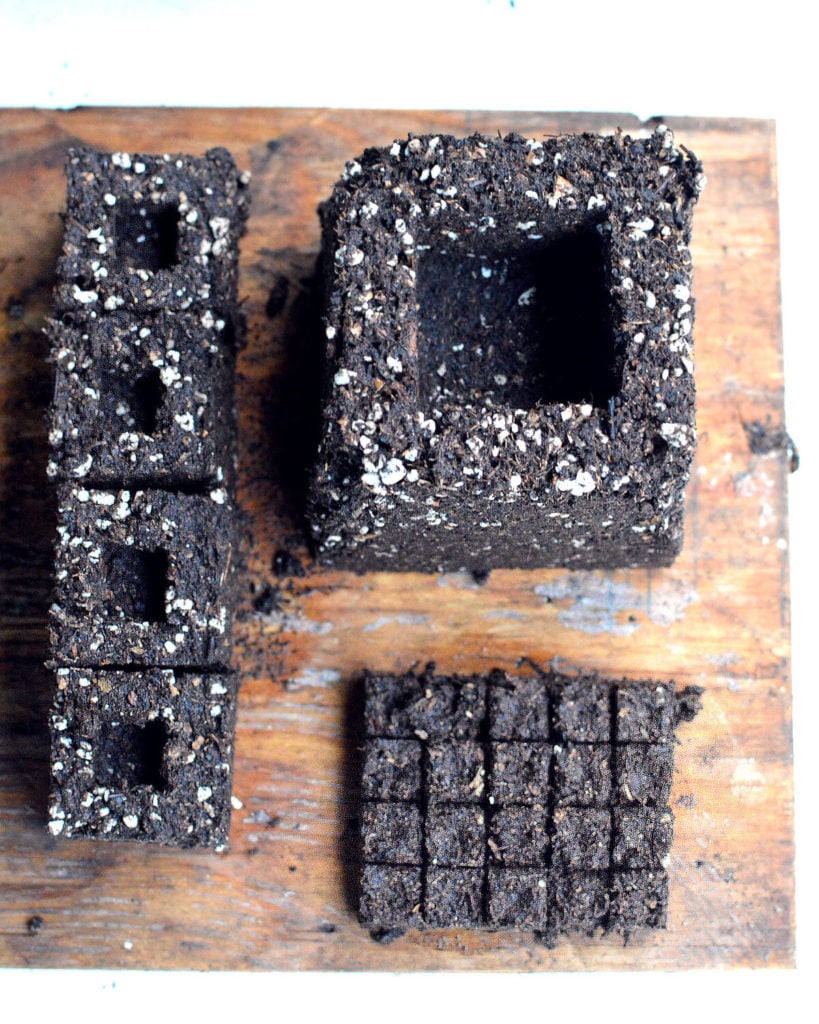
On the flip side, soil blocks have no containers at all and are pressed soil. The benefit of the soil block is plants don’t get root bound, they are able to air prune. They also can be a big money saver in the long run due to the fact that there are no containers needed. You would need to purchase a soil blocker but that’s it.
Which is better? That completely depends on your personal preferences. I love soil blocks for most plants but when I start flowers, I really like plastic trays because I can fit more and use less soil. Totally up to you!
What are the Benefits of Starting Seeds Outdoors vs. Starting Seeds Indoors?
#1 Compared to seed starting under artificial lights, outdoor seed starting makes for healthy, stocky plants. Any jump in health you can give your plants will pay huge dividends in the long run!
#2 Outdoor seed starting in containers or soil blocks can give you a big head start in the winter and early spring because the soil medium heats up faster than soil in a garden, and therefore the seeds will germinate more quickly.

#3 Similar to indoor seed starting, one big benefit of starting seeds outdoors in containers or soil blocks is to get perfect plant spacing with no thinning after sowing. This is because you can measure and grid everything out as you transplant.
#4 When you start seeds outdoors in containers or soil blocks, you also get a jump on the weeds and have a much easier time weeding after they are transplanted. This is because the plants are easy to see, and can be weeded with a tool, rather than by hand which sometimes needs to be done with tiny seedlings.
#5 What is most important to note is overall, outdoor seed starting more closely mimics nature and therefore the results are generally higher quality than starting seedlings indoors under artificial lights.
Methods of Starting Seeds Outdoors
Outdoor seed starting can be done in many ways. You can start them in a greenhouse, high tunnel, caterpillar tunnel, any other unheated tunnel or in cloches or a similar mini greenhouse. The key to get the best results is to make sure they have sunlight and a covered area.

Each method of seed starting outdoors has pros and cons.
Outdoor Seed Starting Method #1 Winter Sowing
But before I jump into pros and cons of each method, I need to talk about a inexpensive specific method of seed starting called winter sowing.
How to start seedlings through winter sowing
Winter sowing is basically the same as any other method of starting seeds in a protected area outdoors, but it’s all miniaturized. So instead of an unheated greenhouse, you can use a recycled container like a milk jug. Cut the milk jug in half so the lower portion can be filled with soil and make several drainage holes in the base before filling.
Plant seeds in the seed starting soil medium at the base of the jug and water thoroughly. The upper portion is utilized as well and acts as a place for the heat of the sun’s rays to collect and warm the soil. The seedlings germinate naturally when the soil heats to the right temperature.
You could also do this in a cell tray with a lid and holes cut in the lid for ventilation.
Now that you know how it’s done, let’s go over the pros and cons of this method.

Pros of Winter Sowing
Winter Sowing is a low cost method of starting seeds outdoors! Many people have old milk jugs or plastic bottles hanging around and could make them easily and with very little money if any at all. There is no required lighting like indoor seed starting.
Seedlings sprout naturally when the timing is right. But at the same time, they also get a big head start on seeds that would be started in the ground.
Cons of Winter Sowing
As with any method of outdoor seed starting, poor ventilation can be a major issue. It can cause damping off and other fungal diseases due to the extra moisture and humidity. You may need to take the lid off on warm days to allow more air to flow.
Starting enough plants for a large garden would take a lot of milk jug or recycled plastic containers if you go that route! I know many people put several seeds into one large one and then separate them out later. It can be done, but you can run into some transplant shock when potting up (the exception being onions, they don’t care!)
As I mentioned above, an alternative would be to do winter sowing in a cell tray with a lid (with holes to vent) as well. This would allow you to plant seedlings more individually and have a little less shock when potting up.
Outdoor Seed Starting Method #2 Starting Seeds in the Ground with Cloches
A cloche is a small translucent cover for protecting or forcing outdoor plants. My mother in law was recently telling me about how she does this to get an earlier yield in her cold zone 3b climate. This is a great way to start seeds outdoors!
She transplants tomatoes, peppers, and sows corn in the ground. Immediately she covers the plant with a clear plastic cup with a hole in the top for ventilation. This keeps the plant warm at night and she says her frost sensitive plants have made it through a late frost with this method.
She doesn’t have problems with fungal diseases when she does this because she is in a dry climate with little humidity. I’m not sure how it would work in a more humid area.
Europeans have been using this method for many years and in the past the clear material was primarily glass with some ventilation holes. Glass would be better in windy conditions, but is expensive. Here is a medium size plastic cloches option.
Outdoor Seed Starting Method #3 Sowing Seeds in a Greenhouse
Pros of starting seedlings in a greenhouse
A greenhouse has supplemental heat, and therefore seeds can be started year round without risk of freezing. In a greenhouse, most often you can simply follow the seed starting recommendations on seed packets.
If your seed packet says sow tomatoes indoors 6-10 weeks prior to your average last frost, you can do that without worrying about a cold night that freezes tomatoes because a greenhouse heated to above freezing.
In a greenhouse, as long as you are close enough to the normal growing season of a plant, the sun is utilized and the seedlings grow strong and stocky.
If you’ve ever purchased seedlings from a big box store or anywhere commercially, they are all greenhouse grown and rarely are they ever leggy because they have been grown in ideal conditions.

Cons of Starting Seedlings in a Greenhouse
Heating costs in a greenhouse should be considered. Unless you are growing commercially or selling a produce, it’s generally not advised to start seedlings like tomatoes in January if your last frost is in May.
One of the other major things to consider with a greenhouse is making sure there is proper ventilation. Similar to growing indoors, if there is no ventilation, the seedlings are susceptible to damping off, and fungal diseases.
Due to the more closed off nature of a greenhouse, you also need to acclimate seedlings to get used to the outdoor wind and weather. Even though they are less likely to get sunscald, the seedlings generally haven’t had the chance to toughen up to outdoor weather conditions like wind or rain.
Outdoor Seed Starting Method #4 Sowing Seeds in a High Tunnel, Caterpillar Tunnel or Other unheated hoop house
A high tunnel, caterpillar tunnel, or even low tunnel are covered spaces that work well for plant protection without extra heat.
For a low cost option, I’d recommend a building a low tunnel. If you want to explore a slightly more expensive but also more permanent option, here’s the difference between a high tunnel vs. caterpillar tunnel.
Pros of Sowing Seeds in a High Tunnel, Caterpillar Tunnel, or Other unheated hoop house
Like all outdoor seed starting, the main benefit is being able to utilize the sun as the light source. I have personally found this to make a huge difference in the health of the plants both short term and in the long run when compared to indoor seed starting.
In an unheated tunnel, seed starting for cool season crops can be jump started and the captured heat can help to germinate the seeds several weeks earlier than if the seeds were directly sown in the ground.

Likewise with warm season crops, you can get a jumpstart on when the seeds would naturally germinate.
Personally, in my caterpillar tunnel, I can open the sides and doors on a warm day to be able to allow plenty of airflow. I have not needed to do any hardening off, the transplanting is seamless and easy!
Cons of Sowing Seeds in a High Tunnel, Caterpillar Tunnel, or Other unheated hoop house
In an unheated tunnel the main risk is cold temperatures. Starting seedlings too early and cold nights can freeze all your hard work.
Especially at risk are the warm season crops. I start my tomatoes in my caterpillar tunnel only four weeks before my average last frost because the cold nights are more few and far between. If we do have cold weather, or a predicted frost, I simply bring the trays inside for the night.
This alternative is much easier than seed starting indoors and going through a very long and arduous process of acclimating them to the outdoors.

As an example, I brought in my tomatoes and peppers from my caterpillar tunnel for maybe four nights between the time I sowed them in soil blocks and when I planted them. This is still far less work than indoor seed starting.
Also in an unheated hoop house, you do need to make sure you allow some ventilation on warm days.
Recommended Supplies for Outdoor Seed Starting in Containers or Soil Blocks
- A high quality seed starting soil mix. I make my own, and here’s my soil block recipe. Other options are Promix or Johnny’s 512. It is likely that you can find Promix locally at a garden center or nursery. Whatever you do, do not undercut yourself before you even get started. I don’t recommend the majority of the common brands found at big box stores (Ferry-Morse, Burpee, etc.)
- Seed tray. Your seed tray choice depends on your personal preference of how to start seeds. I love soil blocks, along with a homemade wooden tray. There is also plastic trays with cells, I only use those for things like flowers that are not particular about their conditions.
- Seeds! This one is obvious but quality seeds matter too. If you’re planning on growing organically, you may want to buy organic seeds as well.

How to Sow Seeds Outdoors in Cell Trays (plastic, recycled, or compostable material) or Soil Blocks
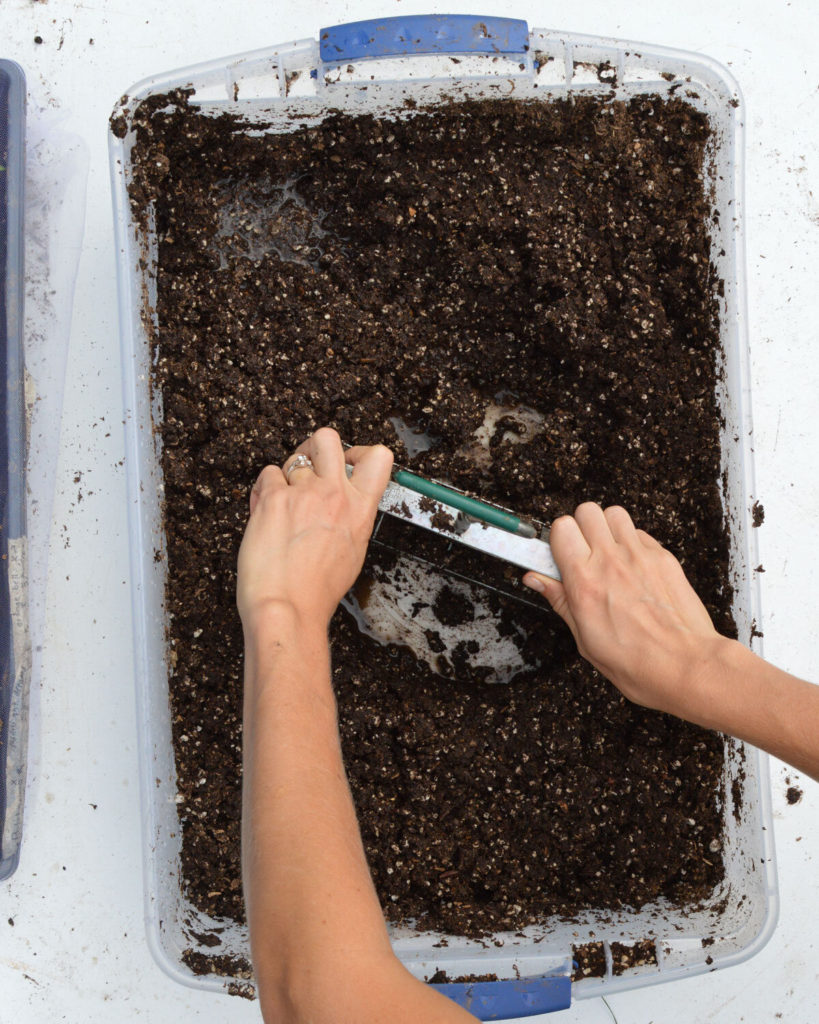
#1 Moisten your soil mix.
Some seed starting soil mixes come with a “wetting agent” on them allowing you to easily moisten them after sowing seeds. If your soil mix doesn’t include this, you must wet down your mix prior to putting it in the tray!
The reason behind this is that most soil mixes are made with peat moss. When peat moss is dry, it is hydrophobic, meaning it repels water. The best way to get peat moss in a soil mix wet all the way through is to moisten it in a container and mix it around until it is all moist, almost like mixing cake batter!
ALTERNATIVE INSTRUCTIONS FOR SOIL BLOCKS: When making soil blocks, the only way to make them is to wet down the mix. If the soil is too dry and they fall apart, if the soil is too wet they slip out before you’re able to compress the soil. When in doubt aim towards the more wet side. It should look like brownie mix when it’s the right moisture level
#2 Fill your Cell Tray with Seed Starting Soil Mix
This is pretty straight forward but some tips I would add are to make sure all the edges of the tray get the same amount as the middle, and that they are filled completely to the top.

ALTERNATIVE INSTRUCTIONS FOR MAKING SOIL BLOCKS:
To make soil blocks you need a fairly deep tray or container, 8-12 inches to pile the wet soil and make blocks. Here’s my a very in depth guide on how to make soil blocks if you need it. Prior to starting, pick the correct dibble, it’s a little plastic piece that creates the depth in the block.
Most soil blocks come with the standard size, I believe it’s a 1/4 inch deep but you can buy other sizes too. This works for most seeds but if I’m planting a large seed I have the 1 inch size dibble for the 2×2 soil blocks too.
As for a tray, I build my own wooden ones, using dimensions and instructions from Eliot Coleman’s Book. I also add wicking fabric directly underneath, with an extra few inches and place two trays over a big half sheet baking pan then fill the pan with water and let the fabric sit in it.
A plastic tray can be used too, but they have their issues if your using it for containing soil blocks. The main problem being that most plastic trays don’t have the structure to hold very heavy blocks. They wobble all over the place when you need to carry them.
#3 Poke a Hole for your Seeds
Add a depression to the soil will help your seeds to germinate. The depth of the hole definitely matters! Check your soil packet and see how deep the seed needs to go.
If you feel unsure, I would go more towards too shallow rather than too deep.
Southern Exposure Seed Exchange has a good general guide that says:
“Seeds need air as well as water to germinate. Sow no deeper than 3 to 4 times the diameter of the seed or in the case of oblong seed no deeper than 1 to 3 times the length of the seed.”
ALTERNATIVE INSTRUCTIONS FOR MAKING SOIL BLOCKS: You don’t need to poke a hole, it’s made for you.

#4 Place seeds in the holes
#5 Cover seeds with soil mix or vermiculite
I cover any seed that is sown at a quarter inch or more with indoor seed starting soil mix. Some people prefer vermiculite since it is lighter. But vermiculite is just one more thing to buy and to be honest, I get just as good of results from covering with moistened soil mix.
Anything that should be surface sown, like lettuce, I do not cover with anything. You’ll need to keep these seeds moist at all times. And I said moist, not soaking so a fine mist of water sprayed a few times will do.
#6 To Cover with plastic or Not to Cover?
Some seed trays come with plastic covers or you can cover a seed tray with plastic wrap, in order to keep the moisture in. With every good thing, comes the ability for it to become something bad too.
The intention is to use these only until the very first seed is emerging. Don’t wait until they all emerge. Take the cover off ASAP when you see the emergence of a seedling. Any longer and you’ll increase the risk of fungal diseases, especially damping off. This fungus will kill the seedlings, usually at the soil surface it will turn brown and die.
I use a cover with I am surface sowing seeds like lettuce.
I rarely use a cover if I have covered the seedling with the soil mix. I would especially not use it if you are sowing peppers, tomatoes, or any other nightshades, which are prone to fungal diseases.
#7 Moisten
If you didn’t pre moisten your soil in step #1, make sure all the soil is moist at this point. It should not be soaked.
#8 Keep the Soil Moist at All Times
Again, do not overwater. Ideally, you should be bottom watering the trays to keep them moist after the seedling emerge. I use a wicking mat placed under the soil tray for this. It takes water in a tray and wicks it up under the tray (since 99% of plastic trays have holes this is where the water is soaked in). The cell trays I like come with this set up. Or you can create your own.
The reason for watering from the bottom is it helps to prevent fungal diseases.
If the soil dries out completely, so will your plants. There isn’t a lot of soil there, so you really need to keep an eye on it!
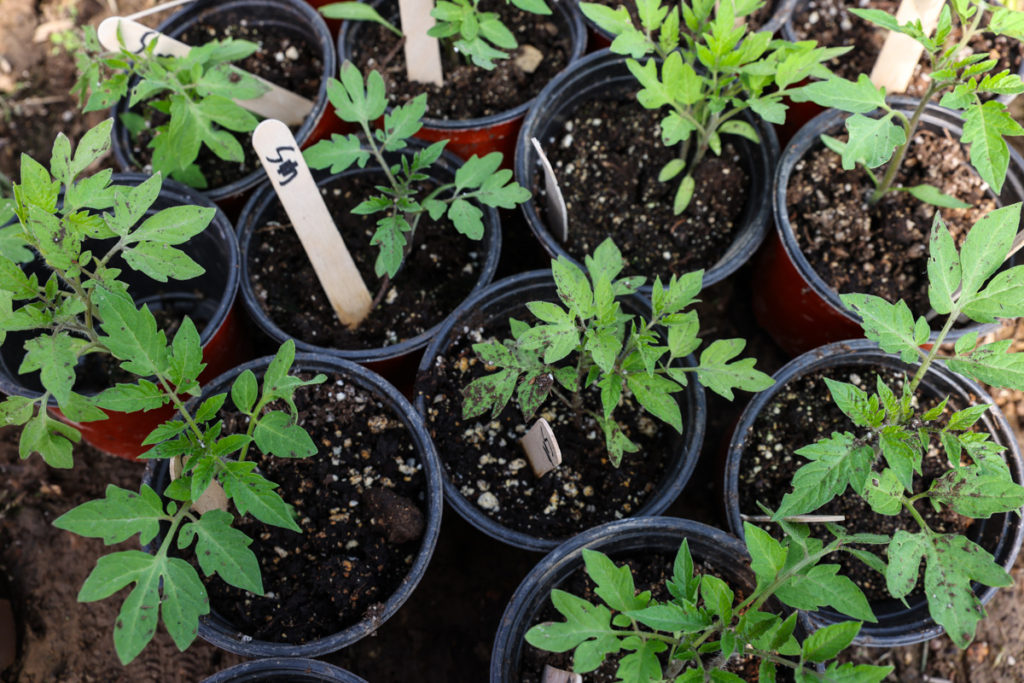
#9 Pot Up Plants as They Grow
If you see roots poking out of your trays, or the plants are getting large and crowded, move them to a larger container and add more soil!
This is a critical step to success, the plants will stagnate in growth if you wait too long to pot them up. When in doubt move them to a larger pot size earlier, rather than too late.
#10 Feed as Needed
Very likely, your seedling will need additional fertilizer until the time they can get outside. My very favorite is a water soluble fish fertilizer. Follow the directions for dilution rates. It is very stinky but works so good.
#11 Transplant Seedlings
Most seedlings are placed in the soil at the same depth as the tray. Tomatoes in particular should be buried deep in the soil a few inches away from the first set of leaves, or placed sideways so the stem is parallel with the soil, the leaves still remain above the soil level. Peppers can also be buried slightly deeper, as can corn- if you’ve ventured into growing that in a seed tray.

Best Tables for Seed starting Outdoors
If you have a larger seed starting area outdoors, you need a surface to grow on. The ground works fine but it’s easier to work on tables.
I’ve tried fold out tables but found they were hard to level and not permeable so the water didn’t drain off easily. When we built our high tunnel seed starting area, we came up with a better solution!

Conclusion:
Outdoor seed starting in containers or soil blocks is an awesome way to get healthy plants early in the season, and to save time in the long run.
I LOVE starting seeds in my high tunnel and how much easier it is than starting seeds indoors. Overall, it’s a great way to mimic nature but also gain more growing time!


